
Inflatable Bouncer Repair Guide:4 Tips

Inflatable Bouncer Repair Guide: Fix Holes, Seam Rips & Leaks Properly
Inflatable Bouncer are a staple for backyard fun, small event rentals, and children’s play areas, made with heavy-duty PVC for durability—but even the sturdiest slides can develop scratches, small holes, seam leaks, or punctures with regular use. Instead of replacing a slide at the first sign of damage, safe, professional DIY repair can extend its life significantly, as long as you follow the correct steps and use the right materials.
This guide is built on professional inflatable equipment maintenance standards, with step-by-step, tested repair methods for common damages, plus critical maintenance tips to prevent future wear.
Core Repair Rule: Always deflate and fully clean/dry the slide before any repair work. Working on an inflated, dirty, or damp slide will cause poor adhesion, failed repairs, and further damage to the material.
1. Pre-Repair Preparation: Clean & Dry (Non-Negotiable First Steps)
Proper preparation is the foundation of a long-lasting repair—skipping this step is the top reason DIY patch jobs fail. Take time to prep the slide correctly to ensure strong adhesion and clean bonding.
- Deflate Completely: Turn off the blower, fully deflate the slide, and lay the damaged area flat on a clean, dry surface. Avoid folding or creasing the damaged spot, as this makes precise repair impossible.
- Locate Leaks & Damage: For small, hard-to-find air leaks (common pinholes), inflate the slide slightly and run a soapy water solution over the surface—bubbles will form where air is escaping. Mark the spot with a washable marker for easy reference.
- Deep Clean the Damaged Area: Wipe the marked repair spot and surrounding vinyl thoroughly with a clean, dry cloth to remove all dust, dirt, sand, debris, and moisture. For sticky residue, use a small amount of mild rubbing alcohol (on a cloth) and let it evaporate fully. The repair surface must be 100% dry and free of grease for the PVC glue to bond.
2. Step-by-Step Repair Methods for Common Damages
Use only professional PVC repair glue and matching PVC patch material—never use household glue, tape, or random fabric scraps. These alternatives won’t bond to vinyl, will peel off quickly, and can worsen damage.
Small Scratches & Puncture Holes
This is the most common repair for minor playtime damage (small scrapes, tiny punctures, or pinhole leaks):
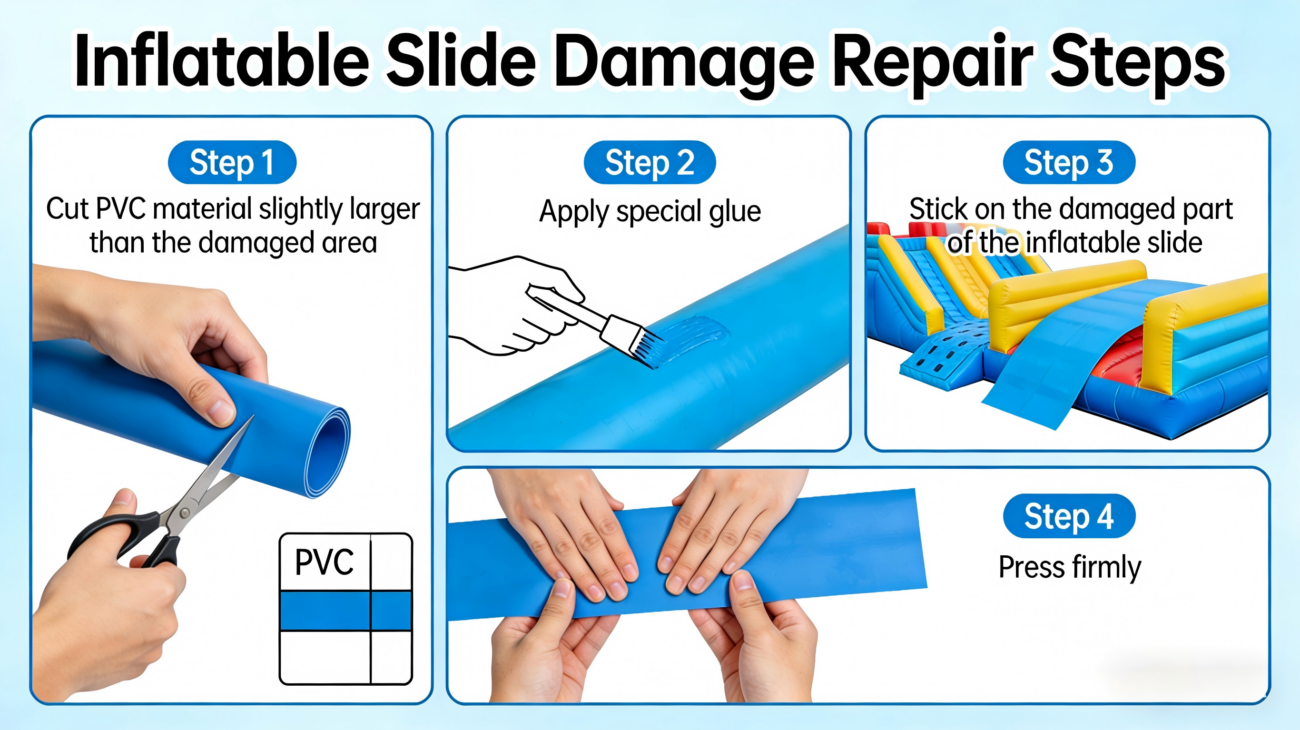
- Cut a PVC patch that’s 2-3 inches larger than the damaged area on all sides (round the edges of the patch to prevent lifting and peeling).
- Apply a thin, even layer of PVC repair glue to both the back of the patch and the cleaned damaged spot on the slide.
- Let the glue sit for 5 full minutes, or until it’s tacky and no longer sticky to the touch (this curing window is critical for a strong bond—rushing this step causes weak adhesion).
- Press the patch firmly onto the damaged area, smoothing out all air bubbles from the center outward. Apply steady, even pressure for 1-2 minutes to ensure full contact.
Seam Rips & Stitched Seam Separation
Seam damage is common from overloading, rough play, or age, and requires extra reinforcement to hold air pressure:
- First, align the ripped seam edges neatly and use heavy-duty, UV-resistant polyester thread to sew the seam closed (use a straight, tight stitch to close the gap fully—do not leave loose threads).
- Cut a long PVC patch to cover the entire stitched area, with extra overlap on both sides of the seam.
- Apply PVC glue to the patch and the sewn seam, follow the 5-minute tacky dry time, then press the patch firmly into place and smooth out bubbles.
- This double reinforcement (stitch + glue) prevents the seam from splitting again under air pressure.
Tiny Pinhole Leaks
For small, isolated pinholes from long-term use:
- Single pinholes: Apply a small dot of PVC glue directly over the hole to seal it; let the glue cure fully.
- Multiple clustered pinholes: Cover the entire area with a single PVC patch (following the small hole repair steps) for durable, long-term sealing.
Severe Damage: When to Return to Factory Repair
Not all damage is suitable for DIY repair—attempting to fix large-scale issues will only waste materials and risk total slide failure. Opt for professional factory repair if:
- The damage is large (big tears, extensive punctures, or full seam detachment)
- The slide has widespread air leaks across multiple areas
- The vinyl is brittle, cracked, or severely faded from UV damage
- Structural seams (weight-bearing areas) are damaged
3. Post-Repair Care: Critical Curing Time
After completing any repair, do NOT inflate the slide immediately. Place the slide in a cool, dry, well-ventilated area and let the repair cure for a minimum of 12 hours (24 hours is recommended for best results). Rushing to inflate will break the glue bond and cause the patch to lift or leak.
4. Daily Maintenance to Prevent Damage & Extend Lifespan
Proactive care is far easier than repairs—follow these rules to avoid scratches, leaks, and premature PVC aging:
- Avoid Sharp Objects: Keep the slide away from knives, branches, rocks, jewelry, metal tools, and any hard/sharp items that can puncture or scratch the vinyl. Never allow items with sharp edges on the slide during use.
- No Graffiti or Markings: Do not draw, paint, or use permanent markers on the slide surface—these damage the PVC coating and are nearly impossible to remove without harming the material.
- Protect From Direct Sunlight: Avoid prolonged exposure to intense sunlight. UV rays break down PVC vinyl, causing it to become brittle, fade, and crack easily. Dry the slide in shade and store it covered when not in use.
- Follow Weight & Player Limits: Never exceed the manufacturer’s stated number of users or weight capacity. Overcrowding causes excess air pressure, which tears seams and stretches the vinyl beyond its durability limit.
Final Thoughts
Minor inflatable bouncer repairs are simple and cost-effective with the right materials and proper technique, as long as you prioritize cleaning, curing time, and correct patching. By tackling small damages early and following consistent maintenance habits, you can keep your inflatable slide safe, functional, and in great condition for years of use.
Always prioritize safety: if damage is too severe for DIY repair, trust factory service to avoid safety hazards during play. This guide reflects professional, field-tested practices to ensure reliable, long-lasting results for every user.