
How to Blow Up an Inflatable Water Slide?
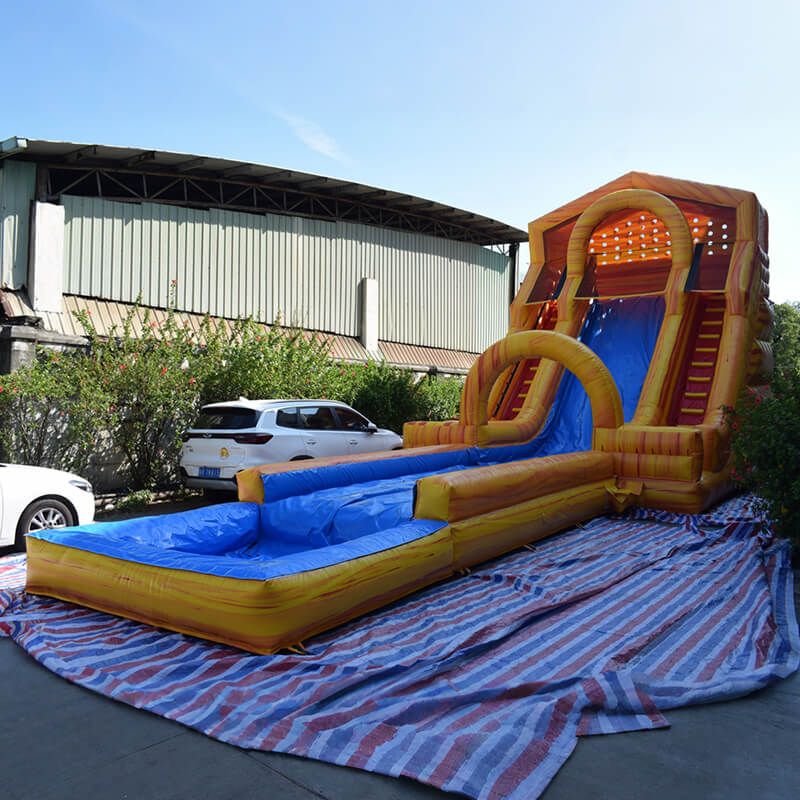
Nothing beats cooling off on a hot summer day than a backyard inflatable water slide. Whether you’re hosting a kid’s birthday party or just want weekly fun for your family, inflating your slide correctly is the first step to a safe, long-lasting season of play. Many first-time owners make simple mistakes that can lead to punctures, over-inflation bursts, or even tipping injuries. As outdoor recreation safety writers with over 5 years of testing backyard water play equipment, we’ve created this guide aligned with ASTM recreational inflatable safety standards and manufacturer guidelines to walk you through every step correctly.
What Do You Need to Blow Up an Inflatable Water Slide?
Gather these supplies before you start to avoid mid-inflation delays:
- Compatible electric air pump (most new inflatable water slides come with a manufacturer-matched pump)
- Heavy-duty ground cloth/protective tarp (to shield the slide’s PVC base from rocks and roots)
- Anchoring stakes (for grass installation) or 20-30lb heavy sandbags (for concrete/patio installation)
- Tape measure (to confirm your space fits the slide’s full footprint)
- Work gloves (to protect your hands from sharp yard debris)
- A second person (for slides over 10ft tall – one person cannot safely spread and align large models alone)
Step-by-Step: How to Inflate Your Inflatable Water Slide Correctly
1. Prep your installation location
First, pick a flat, level spot with natural drainage (you don’t want standing water pooling around your slide after use). Clear the entire area of any rocks, sticks, broken glass, tree roots, or sharp debris that could puncture the slide’s PVC base. Keep the slide at least 6 feet away from fences, trees, pools, or outdoor structures to avoid collision injuries. Never inflate on unsteady sloped ground – uneven terrain puts uneven stress on inflatable chambers and can cause the slide to tip over during use.
2. Lay down your protective ground cloth
Even if you’ve cleared all visible debris, a ground cloth adds an extra layer of protection against abrasive grass, hidden rocks, and moisture that breaks down the slide’s base over time. Unfold the cloth and center it in your prepped space, making sure it covers the entire footprint of the slide.
3. Unfold and spread out your inflatable slide
Carefully unfold your deflated slide onto the center of the ground cloth. Shake it out to spread it flat, and double-check that all inflatable chambers, tunnels, and slide lanes are untwisted and straight. Any twisted or folded chambers will restrict airflow and cause uneven pressure that can split seams during inflation.
4. Connect your pump to the inflation valves
Most inflatable water slides have one or more inflation valves, typically Boston valves for larger main chambers. Match the pump nozzle to your valve, then screw or clip it on tightly to prevent air leaks during inflation. If your slide has multiple inflation valves, open all valves before you start pumping to ensure even airflow across all chambers.
5. Inflate and monitor pressure constantly
Turn on your pump and stay close by – it only takes 1-2 extra minutes for dangerous over-inflation to occur. Stop inflation when the slide is firm but still has a slight give: when you press your palm firmly into the side of the main chamber, it should give 1-2 inches. If it feels rock hard, you’ve over-inflated, so release a small amount of air immediately.
Pro tip: Air expands 10-15% as temperatures rise. If you’re inflating under full sun on an 80°F+ day, leave extra give to account for heat expansion, which is the leading cause of inflatable burst accidents.
6. Secure the slide and seal valves
Once inflated to the correct pressure, disconnect the pump and immediately seal all inflation valves tightly to prevent slow leaks. Next, anchor your slide: every inflatable water slide has built-in D-ring anchor points at every corner and along the base. For grass installation, hammer an anchoring stake through each D-ring deep into the ground. For hard surfaces like concrete, tie a heavy sandbag to each D-ring. The U.S. Consumer Product Safety Commission (CPSC) records dozens of incidents each year of unanchored inflatable slides being blown into roads or fences by moderate wind, causing serious injury.
7. Do a final safety check
Walk around the entire slide, double-checking all seams for leaks, all anchors are tight, and no chambers are twisted. Your slide is now ready for use!
How Long Does It Take to Blow Up an Inflatable Water Slide?
Inflation time depends on the size of your slide and the power of your pump:
- Small 1-2 person kid slides: 6-15 minutes with a standard 120V pump
- Medium 3-6 person family slides: 15-30 minutes
- Large 10ft+ tall party-sized slides: 30 minutes to 1 hour
Common Mistakes to Avoid When Inflating Your Water Slide
- Over-inflation: This is the #1 cause of inflatable water slide damage and accidents. A rock-hard slide is at extreme risk of bursting when temperatures rise, and puts excess stress on seams that can cause them to split mid-use.
- Skipping ground prep: Even a small sharp stone can puncture a slide’s base after a few hours of use, leading to slow leaks that ruin your event.
- Forgetting to anchor: Even light wind can move a 200lb fully inflated slide enough to cause it to tip or crash into surrounding structures.
- Using the wrong pump: Car tire pumps and unregulated air compressors deliver too much pressure too quickly, making over-inflation almost unavoidable for inexperienced users. Always use the manufacturer-provided pump matched to your slide’s size.
Frequently Asked Questions
Can I use an air compressor to blow up my inflatable water slide?
We don’t recommend it for most home users. While it’s possible if you have a precision pressure regulator that can keep pressure under 1-2 PSI (the standard for most residential inflatable slides), it’s very easy to accidentally overinflate. Stick to the manufacturer-provided electric pump for safest results.
Can I blow up my inflatable water slide the night before using it?
We don’t recommend inflating more than 2-3 hours before use. Overnight, temperatures drop and air contracts, leading to under-inflation, then dangerous over-expansion as temperatures rise during the day. If you do need to inflate the night before, release 15% of the air before leaving it overnight, then top it off the next morning before use.
How do I know if my inflatable water slide is inflated enough?
The industry rule of thumb: firm but flexible. If you can press the side of the slide and feel a slight give, it’s properly inflated. If it doesn’t give at all, it’s overinflated – release some air immediately.
Final Thoughts
Blowing up an inflatable water slide doesn’t have to be complicated or stressful. By following these manufacturer-aligned safety steps, you’ll avoid common damage and injuries, and get years of summer fun out of your water slide. Always prioritize safety over speed, and adjust air pressure for hot weather to keep your whole family safe.